
Posted by Rod Connors on 22nd Oct 2026
What Supplies Do You Need to Make a Rosary?
A Beginner's Guide to Crafting your Rosary
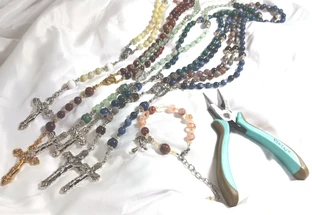
Have you ever wanted to make your own rosary but weren't sure which supplies you would need? Whether you are creating a traditional Catholic rosary, a gemstone rosary, a special handmade gift, or a rosary bracelet, getting started is easier when you understand the basic components.
At Bead3, we have been helping people discover beads and jewelry-making supplies online for more than 20 years. In this guide, we'll explain the essential materials and tools used to make a rosary, how the components work together, and what to consider when choosing supplies for your first project.
1. Rosary Beads: Choose Your Size, Color and Material
The beads are one of the most enjoyable parts of designing a handmade rosary. They determine the color, texture and overall appearance of your finished piece.
There are many possibilities when selecting rosary beads:
-
Czech glass beads: Available in many colors, shapes and finishes, these beads are a versatile choice for rosary making.
-
Semiprecious gemstone beads: Amethyst, rose quartz, jasper, labradorite and other gemstones can give a rosary a distinctive natural appearance. Semiprecious Gemstone Beads feel amazing in your hands when praying the Rosary!
-
Glass pearl beads: These offer a classic pearl-like look and are available in colors that coordinate beautifully with metal components.
-
Crystal beads: Faceted glass crystals add sparkle and can be used to create an elegant design.
-
Other glass beads: Explore different finishes, colors and shapes to make your rosary personal and distinctive.
What size beads should you use?
Bead size affects both the appearance and feel of a rosary. Common choices include 6mm, 8mm and 10mm round beads, although other sizes and shapes can also work. We prefer 8mm beads for Hail Mary Beads and 10mm beads for Our Father Beads. However, 6mm for Hail Mary Beads is also very common.
Smaller beads can create a delicate design, while larger beads produce a more substantial feel. Consider the bead-hole size, the thickness of your wire or pins, and the dimensions of your rosary center and crucifix when selecting components. Most of our beads have a 1mm hole which works perfectly with all of our eye pins and braided wire.
Explore the Bead3 Rosary Making Supplies category to find components for your project.
2. Rosary Centers: Connect the Sections
A rosary center, sometimes called a centerpiece or center medal, connects the main sections of a traditional rosary. Many designs feature religious imagery, making the center an important visual element.
When choosing a rosary center, consider:
-
Size: A smaller center may suit a delicate rosary, while a larger center can complement larger beads.
-
Finish: Silver, antique silver, gold, antique copper, antique bronze and other finishes can coordinate with your beads and chain.
-
Design: Choose a style that complements the overall appearance of your rosary.
-
Connection points: Check how the center attaches to the beaded sections and the remaining rosary components.
Browse Rosary Centers at Bead3 to compare styles and sizes.
3. Rosary Crucifixes: Choose the Finishing Component
The Crucifix is an essential component of a traditional Rosary and helps define its overall appearance.
Rosary Crucifixes are available in different sizes, materials, finishes and designs. When selecting one, consider its proportions relative to your beads and center. Matching or coordinating the metal finishes can help create a cohesive design.
Also check the attachment points so that the Crucifix can be connected securely using the appropriate chain or wire-linked components.
Explore the Rosary Crucifixes collection at Bead3 to find a style for your project.
4. Eye Pins: Connect Beads Together
Eye pins are particularly important when making a traditional wire-linked rosary.
An eye pin is a straight piece of wire with a small loop already formed at one end. To use one, thread a bead onto the straight portion, trim the wire if necessary, and form a second loop at the other end using round-nose pliers.
The loops can then be connected to neighboring bead sections or other components.
When selecting eye pins, consider:
-
Length: Choose a length that accommodates your bead and leaves enough wire to form a loop.
-
Wire thickness: Make sure the wire fits through the bead hole and is suitable for forming secure loops.
-
Metal finish: Coordinate the finish with your chain, center and crucifix.
-
Quantity: If you're making several rosaries, consider buying a pack size that suits your project.
Bead3 offers a dedicated selection of Eye Pins for Rosary Making in different lengths and finishes.
5. Rosary Chain: Connect the Components
Some rosary designs use metal chain to connect the center, crucifix and beaded sections. Chain can provide a traditional appearance and help connect sections of the finished rosary.
When choosing rosary chain, look at the link size, finish and overall strength. The links need to be suitable for the way you intend to connect the components.
You should also consider the length you need and whether the chain finish complements your eye pins, center and crucifix.
Shop Rosary Chain at Bead3 for chain specifically intended for rosary-making projects.
6. Rosary-Making Tools: Pliers and Cutters
The right tools make assembling a rosary easier, especially when you are forming wire loops and connecting small components.
Here are the main tools to consider:
Round-nose pliers
These have rounded jaws that help you form loops in wire. They are particularly useful when making eye-pin connections.
Chain-nose pliers
These have tapered, flatter jaws that help grip wire, adjust small connections and close loops.
Wire cutters
Cutters help trim excess wire when preparing eye pins and other suitable jewelry components. Always check the manufacturer's specifications before cutting wire or chain.
Combination rosary pliers
A combination tool with round-nose tips and a built-in side cutter can be a convenient option for beginners because it combines two functions in one tool.
If you are starting from scratch, a combination rosary plier may be a practical first purchase. More experienced makers may prefer separate pliers for different tasks.
Explore Rosary Pliers with Side Cutter and Round Nose and browse the wider Jewelry Making Tools collection for additional options.
7. Optional Supplies for Special Designs
Once you understand the basic components, you can explore other materials for more specialized projects.
Depending on your design, you might also use:
-
Spacer beads: Add visual interest between larger beads.
-
Decorative metal beads: Coordinate with your center and crucifix.
-
Gemstone bead combinations: Create a distinctive color palette or natural-stone design.
-
Smaller beads for rosary bracelets: Adapt your design for a compact wearable piece.
Not every rosary needs these additional supplies. Start with the components required for your chosen design, then add decorative elements if they suit your project.
8. An Easier Way to Get Started: DIY Rosary Making Kits
If choosing every component separately feels overwhelming, a DIY rosary-making kit can be a convenient starting point.
A kit can bring together beads and selected components for a particular project, helping you spend less time searching for compatible materials. Before beginning, check the kit description to see exactly what is included and whether pliers or other tools must be purchased separately.
Explore the DIY Rosary Making Kits at Bead3 to discover available designs and find a project that appeals to you.
9. Make Your First Rosary: A Simple Planning Checklist
Before you begin, make sure you have the supplies required for your chosen construction method.
- Rosary beads in your preferred size and material
- A rosary center
- A crucifix
- Eye pins for a traditional wire-linked design
- Rosary chain, if required by your design
- Round-nose pliers or suitable combination rosary pliers
- Suitable wire cutters, if needed
The exact materials depend on the rosary design and construction technique. Follow your pattern or instructions to determine the number and arrangement of beads and components.
Take your time when forming wire loops and connecting sections. Check that each connection is secure and that the finished rosary is comfortable to handle.
Find Rosary-Making Supplies at Bead3
Making a rosary is an opportunity to choose beads, colors and components that come together in a meaningful design. Whether you are creating your first rosary, making a gift or exploring new gemstone and glass bead combinations, understanding the basic supplies helps you prepare for your project.
Bead3 offers a selection of rosary beads, eye pins, chain, centers, crucifixes and jewelry-making tools to help you find the components you need.
Ready to begin? Visit our Rosary Making Supplies category to explore the available materials, or browse our DIY Rosary Making Kits for a convenient way to start your next project.